
Hoagie rolls are crusty, chewy bread rolls originating from Philadelphia. They’re soft inside with a golden crust, perfect for sandwiches. This easy recipe guide helps you make homemade hoagie rolls, ideal for Philly cheesesteaks, subs, or your favorite fillings.

Ingredients and Equipment Needed
To make delicious hoagie rolls, you’ll need a few simple ingredients and some basic baking equipment. Here’s a list of what you’ll require:

- Ingredients:
- 2 cups of warm water
- 1 tablespoon of active dry yeast
- 1 teaspoon of sugar
- 4 cups of all-purpose flour
- 1 teaspoon of kosher salt
- 1 cup of milk
- 1 egg (for egg wash)
- 2 tablespoons of olive oil or butter
- Equipment:
- A large mixing bowl or stand mixer
- A dough scraper or spatula
- A clean, lightly floured surface for kneading
- Baking sheets lined with parchment paper
- Plastic wrap for rising
- An oven preheated to 425°F (220°C)

Ensure all ingredients are at room temperature before starting, and have your equipment ready to streamline the process. Metric measurements are available for convenience.
The Hoagie Roll Recipe
Combine warm water, yeast, and sugar, then mix with flour, salt, milk, egg, and oil. Knead until smooth, let rise, shape into rolls, and bake until golden. This yields soft, crusty rolls perfect for sandwiches.
3.1. Mixing the Dough
Start by combining warm water, yeast, and a pinch of sugar in a mixing bowl. Let it sit for 5 minutes until frothy. Add flour, salt, milk, egg, and oil. Mix until a shaggy dough forms. Use a stand mixer or mix by hand until smooth. Ensure ingredients are well incorporated without overmixing.

3.2. Kneading and Rising
Transfer the dough to a lightly floured surface and knead for 8-10 minutes until smooth and elastic. Use a stand mixer with a dough hook attachment or knead by hand. Place the dough in a lightly oiled bowl, turning to coat evenly; Cover with plastic wrap or a damp cloth and let rise in a warm, draft-free place for 1 hour, or until doubled in size. This step is crucial for developing the gluten and creating the airy texture of the rolls; Ensure the environment is warm, around 75°F to 80°F, to promote yeast activity. After rising, the dough should feel light and slightly springy when pressed gently. Avoid overworking the dough at this stage to maintain its tender structure. Proper kneading and rising are essential for achieving the perfect balance of crust and softness in homemade hoagie rolls. Letting the dough rest allows the yeast to ferment, enhancing the flavor and texture. Once risen, the dough is ready to be shaped into individual rolls.
3.3. Shaping the Rolls
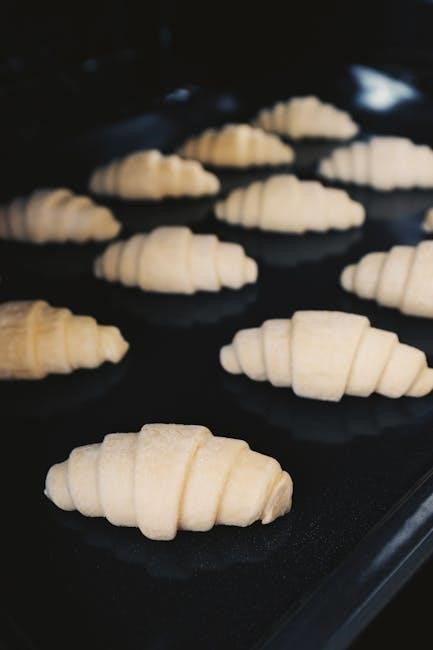
Once the dough has risen, punch it down to release any air bubbles. Divide the dough into 6-8 equal pieces, depending on the size of rolls you prefer. Roll each piece into a 12-inch (30cm) log shape, applying gentle pressure to form a uniform cylinder. Place the shaped rolls on a baking sheet lined with parchment paper, leaving about 1 inch of space between each roll to allow for expansion during the second rise; For a more authentic shape, you can place the rolls on a metal baguette tray if available. Cover the rolls with plastic wrap or a clean kitchen towel and let them rise in a warm place for 30 minutes, or until they have puffed slightly. This step ensures the rolls retain their shape and develop a light, airy interior. To achieve even baking, make sure the rolls are evenly spaced and not overcrowded. Lightly brush the tops with water or egg wash for a golden finish before baking. Proper shaping is key to creating the iconic hoagie roll texture and appearance.
3.4. Baking to Perfection
Preheat your oven to 425°F (220°C) and ensure the rack is in the middle position for even baking. Place the shaped hoagie rolls on a parchment-lined baking sheet, leaving about 1 inch of space between each roll. If desired, brush the tops with egg wash for a golden finish or melted butter for a softer crust. Bake for 12-15 minutes, or until the rolls are golden brown and sound hollow when tapped on the bottom. For a crisper crust, bake for an additional 2-3 minutes, watching carefully to avoid burning. To enhance crispiness, create steam in the oven by placing a pan of water on the bottom rack during baking. Once baked, allow the rolls to cool on a wire rack for at least 10-15 minutes before slicing or serving. Cooling ensures the interior stays soft and the crust remains firm. Store cooled rolls in an airtight container at room temperature for up to 2 days or freeze for up to 1 month. Reheat frozen rolls in the oven at 350°F (175°C) for 5-7 minutes to restore freshness.
Cooling and Storage
Cooling and storage are crucial steps to maintain the freshness and texture of your hoagie rolls. After baking, allow the rolls to cool on a wire rack for at least 10-15 minutes before storing. This step prevents moisture from getting trapped, which can make the rolls soggy or moldy.
For short-term storage, place the cooled rolls in an airtight container or zip-top bag at room temperature. They will stay fresh for up to 2 days. For longer storage, freeze the rolls in an airtight container or freezer-safe bag for up to 1 month. Frozen rolls can be reheated in the oven at 350°F (175°C) for 5-7 minutes to restore their freshness.
When freezing, consider separating the rolls with parchment paper to prevent them from sticking together. Label the container with the date to ensure you use the oldest rolls first. Always store rolls in clean, dry containers to prevent contamination and spoilage.

Before consuming stored rolls, check for signs of staleness or mold. If the rolls feel dry or hard, they can still be used for toasting or as croutons. Proper storage ensures your homemade hoagie rolls remain soft and delicious for as long as possible.
Customizing Your Hoagie Rolls
Customizing your hoagie rolls allows you to tailor them to your taste preferences or dietary needs. Start by experimenting with different flours, such as whole wheat, rye, or a gluten-free blend for a unique flavor and texture. Adding ingredients like sesame seeds, poppy seeds, or dried herbs to the dough can enhance the rolls’ appearance and taste.
For a crispy crust, brush the rolls with an egg wash or steam them during baking. If you prefer a softer texture, skip the egg wash and brush the rolls with melted butter after baking. You can also incorporate cheese, garlic, or herbs into the dough for added flavor. For a vegan version, replace dairy products with plant-based alternatives like almond milk or vegan butter.
Another way to customize is by adjusting the size and shape of the rolls. Make them smaller for sliders or larger for hearty sandwiches. Use a metal baguette tray to achieve uniform shapes and a professional look. These customizations ensure your hoagie rolls are not only delicious but also perfectly suited to your favorite recipes and preferences. The versatility of this recipe makes it easy to adapt to any culinary creation.

Tips for Achieving the Perfect Texture
Achieving the perfect texture in hoagie rolls requires attention to detail during each step of the process. First, ensure your ingredients are at room temperature, as this helps the dough come together smoothly. When mixing, avoid overworking the dough, as this can lead to a dense texture. Instead, mix until the ingredients just combine, then let the dough rest before kneading.
Kneading is crucial for developing the gluten, which gives the rolls their chewy interior and soft texture. Use a lightly floured surface and knead for about 10 minutes, until the dough becomes smooth and elastic. After rising, gently shape the dough into rolls without overworking it, as this can deflate the dough and result in a denser texture.
During baking, a steamy environment helps create a crispy crust while keeping the interior soft. Place a pan of water or ice in the oven to generate steam. Bake until the rolls are golden brown but still soft to the touch. Avoid overbaking, as this can make the rolls hard. Finally, let the rolls cool slightly on a wire rack before serving to ensure the texture remains consistent. By following these tips, you’ll achieve perfectly textured hoagie rolls every time.
Troubleshooting Common Issues
When making hoagie rolls, common issues can arise, but they’re easy to fix with the right adjustments. If your dough isn’t rising, check that your yeast is active and not expired, and ensure the room temperature is warm enough. If the rolls turn out too dense, it may be due to overmixing the dough or using too much flour. Mix just until ingredients combine, and use a light hand when adding flour.
If the rolls are too crusty, it could mean overbaking. Keep an eye on them during the last few minutes of baking. For a softer crust, brush the rolls with melted butter immediately after baking. If the rolls lack shape, ensure the dough is well-rested and not overproofed. Gently shape the rolls without deflating them too much.

For a more even rise, place the rolls evenly spaced on the baking sheet. If the rolls stick together, lightly dust the baking sheet with cornmeal or parchment paper. By addressing these common issues, you can achieve perfectly textured hoagie rolls every time. Adjustments are key to mastering the recipe.
Making homemade hoagie rolls is a rewarding process that yields delicious, authentic results. With simple ingredients and straightforward steps, this recipe is perfect for both beginners and experienced bakers. The key to achieving the perfect texture lies in proper mixing, kneading, and baking techniques. Whether you’re crafting Philly cheesesteak sandwiches or custom subs, these rolls provide the ideal base for your creations.
The downloadable hoagie roll recipe PDF offers a convenient guide, ensuring you can easily follow along and achieve consistent results. Customization options, like adding sesame seeds or herbs, allow you to tailor the rolls to your taste preferences. Proper storage tips extend the freshness of your homemade rolls, making them a versatile addition to your kitchen.
By following this guide, you’ll enjoy soft, chewy interiors and golden, crusty exteriors—exactly what makes hoagie rolls a favorite. Happy baking, and don’t hesitate to experiment with new flavors and fillings to make your sandwiches truly special!